


Astrophotography and Deep Sky Photography Tips - Part III
Calibration Frames:
For the absolute best results for astro-imaging it is best to implement the use of Calibration Frames. This will take more time and effort but the results are much higher clarity, sharpness, detail, color vibrance, etc... So, what are calibration frames? They are images that are applied to the primary image frames (Light Frames) to help remove defects and assist in improving overall detail.
Light Frames:
Light Frames are the Monochrome, RGB, or Single Shot Color primary images of the subject you wish to capture. For example, if you are imaging the Orion Nebula (M42) these are the exposures of the actual subject.
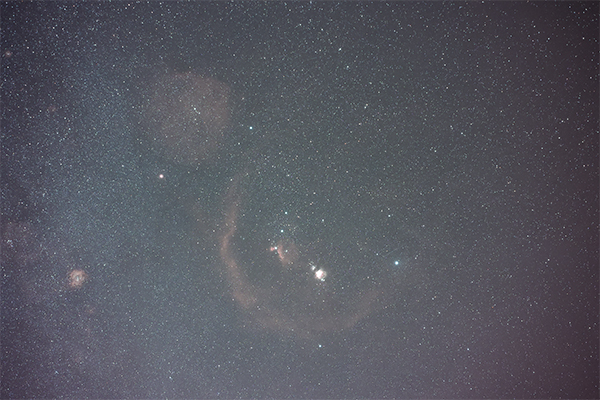
Light Frame Example - M42 - Orion Region - Canon EOS R6 - Visible + H-Alpha modification - Irix 45mm lens.
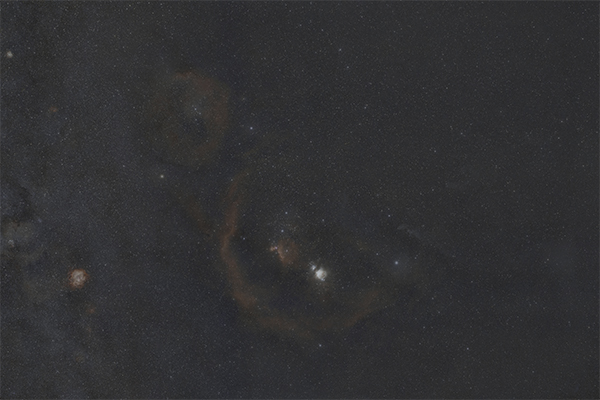
Flat Frames:
Flat Frames are short exposures using the imaging optics with the camera pointed at an evenly illuminated field. They record uneven field illumination due to vignetting caused by the optics and due to partial obstructions in the light path such as dust particles on the sensor, and they are used to remove that uneven field illumination from the light frames. For best results, Flat Frames can be taken by pointing the camera at the twilight sky while covering the aperture with a smooth, translucent, light colored material (preferably white) such as a t-shirt. Flat frames may also be captured by covering the end of your lens or telescope with anLED light panel that provides a flat, even, smooth lighted area. Using AV mode, capture 15 to 20 exposures. They must be taken with the camera in exactly the same orientation relative to the telescope or lens as used for the light frames, so they are usually taken at the beginning or end of each imaging session. ISO isn't critical but most people use the same ISO as used for the light frames. The master offset frame is subtracted from each flat frame, and then the flat frames are averaged to make a master flat frame. The master flat frame is divided into each of the light frames, after the master Bias and master Dark frames have been subtracted from the light frames.

Flat Frame Example - M42 - Orion Region - Canon EOS R6 - Visible + H-Alpha modification - Irix 45mm lens.
Bias Frames:
Bias Frames are very short exposures made with no light reaching the sensor. With a DSLR, they are taken at the fastest possible shutter speed and lowest possible ISO, with the body, lens or telescope capped. Their purpose is to remove the read noise that is present and roughly the same in every frame. You should take a large number of Bias frames (~50), and DSS will average them to create a master Bias frame, which it will subtract from every other frame used in the image processing. You don't need to take new Bias frames very often, just once or twice a year, because the read noise doesn't change much over the life of a DSLR. The Bias frames also contain the "Offset" signal, an elevated baseline added to every image by the camera electronics. With my Canon 350D, the Offset signal is 255 counts out of a maximum range of 4,096 counts (12-bits). So subtracting the Bias frame from every other shot removes the Offset signal as well as the read noise.

Bias Frame Example - M42 - Orion Region - Canon EOS R6 - Visible + H-Alpha modification - Irix 45mm lens.
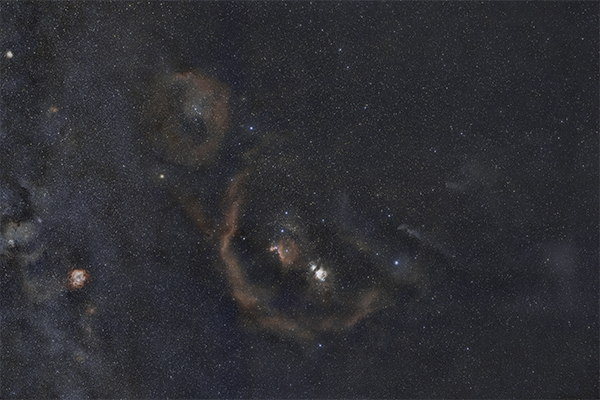
Dark Frames:
Dark Frames are made at the same exposure time and ISO as the subject light frames, but with no light reaching the sensor. They should also be made at approximately the same temperature as the light frames. Normally they are interspersed in the imaging session, or taken at the end of the imaging session. Their purpose is to remove the thermal noise from the light frames. Normally you want between 10 and 20 dark frames during each imaging session, and if you use multiple exposure time or ISO values for the light frames during a session, you must acquire sets of dark frames to match the exposure and ISO of each set of light frames. The master Bias frame is subtracted from each of the dark frames before they are combined to create a master dark frame.

Dark Frame Example - M42 - Orion Region - Canon EOS R6 - Visible + H-Alpha modification - Irix 45mm lens.
Comments:
With regular and frequent improvements and advances of editing software the need for Calibration Frames is diminishing. Some photographers don't use calibration frames at all. Our recommendation is to use calibration frames when feasible. We have found the use of Flat Frames to be the most beneficial. Dark Frames second, and Bias Frames last. This does not mean any of the calibration frames are of little to no benefit. Calibration Frames are beneficial but implementation can be time consuming.
Aligning and Stacking Image Frames:
There is no good substitute for Aligning and Stacking your images to remove or reduce noise and for adding clarity and detail to your images. Importing your images into a stacking and alignment software program will dramatically improve the end results. Here are a few programs we recommend for this process.
PixInsight:
PixInsight is a one-time purchase astro image editing software program including lifetime updates at no additional charge. Always up to date with frequent updates which constantly improve performance and flexibility. In our opinion, at the time of this publication, PixInsight is the best and most comprehensive astro-editing program on the market. The learning curve can be daunting and may take a little time to learn. We have produced some introductory tutorial videos that can be found on our Astrophotography Editing Tutorial pages. They can also be found on our YouTube page. Subscribing to our YouTube page will ensure you are notified of frequent additions. These video tutorials will help introduce you to the techniques and benefits of PixInsight. We are not a sponsor of PixInsight and do not receive any compensation for PixInsight purchases. We are simply being honest in our recommendations.
SEquator and Starry Landscape Stacker:
SEquator and Starry landscape Stacker are the Windows and Apple compatible version of simple stacking and alignment programs. They are either free or cost a very small amount. Simple to use and with great results, both programs work very well, especially for basic alignments and even for Nightscape images.
CCD Stack, Siril, Deep Sky Stacker, etc...:
CCD Stack, Siril, Deep Sky Stacker as well as others available on the market are great alternatives to PixInsight. Although they can produce impressive results, we have found PixInsight to be much more comprehensive and without equal. We are not a sponsor of PixInsight and do not receive any compensation for PixInsight purchases. We are simply being honest in our recommendations.
Image Integration:
Using the processes within the stacking and alignment software of your choosing the calibration frames are integrated into a final stacked file.
Integrated Image - M42 - Orion Region - Canon EOS R6 - Visible + H-Alpha modification - Irix 45mm lens.
Edited Image:
Below is an example of an image after implementing basic editing processes explained in our video tutorials on our Astrophotography Editing Tutorial page. PixInsight and Adobe Photoshop were used to perform this edit.
Basic Image Edit - M42 - Orion Region - Canon EOS R6 - Visible + H-Alpha modification - Irix 45mm lens.
As always, please contact us with any questions regarding this or any other product or service we provide: info@spencerscamera.com